Supporting 2FA Apps
Learn how to setup and use any of the below mobile apps to work with two-factor authentication on Buyerdock.

The process to get started is very similar and easy for all apps; scan the QR code once and the app starts generating the one-time code you need to login to your website. Below is the list of apps we support.
Instructions
Authy
Launch the Authy application. Select the menu icon from the upper right hand corner of the screen and choose “Add Account” from the available menu items.

In this step you can choose to either scan the QR code the plugin provides with your device’s camera or enter your verification code manually.

Once you have scanned the QR code (or entered the code manually) you will be allowed to give your new account a unique nickname and icon. This helps you quickly identify your newly added account in case you have multiple accounts within the Authy app. To continue, hit save and you will be presented with your new authentication token.

If you have not already done so, in the 2FA setup wizard, continue to the next step and enter this code into the “Authentication Code” field.

Once submitted, we will verify your code. If all is well, you will have successfully added an important layer of protection to your Buyerdock login authentication.
Google Authenticator
Being one of the most popular authentication apps around, Google Authenticator simplifies the process of adding a new account to your app. To begin tap the “+” icon in the app home screen in the lower right corner of the screen.

Once prompted, select to scan the QR code or enter the code manually. Scan the code or enter the code provided in our setup wizard.

When ready. you will be redirected back to the home screen, where you can see all your 2FA codes. The new account will be at the bottom of the list should you have other accounts on the app.
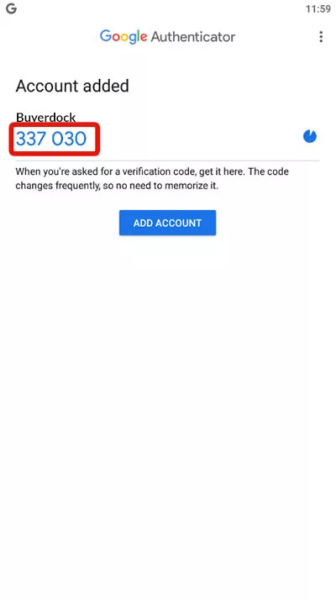
Now you can now continue the 2FA setup wizard, so head to the next step and simply enter the code into the “Authentication Code” field. Once submitted, our system verifies your code and if all is well it notifies you.
Microsoft Authenticator
To set up 2FA via the Microsoft Authenticator app, from the application home screen – hit the “Add Account” button present in the main app area.

Then you can specify what type of account you are adding. Make a selection and then you will be asked to scan the QR code that the Buyerdock 2fa setup process provides, or manually enter the code.
Immediately after you scan or enter the code provided, you will be taken back to the home screen, where your newly added account will be listed. Click it to reveal your verification code.
Enter this code into the “Authentication Code” field in the Buyerdock 2fa setup process. Once verified, you will have successfully added 2FA protection to your Buyerdock account.
Duo Security
Duo Security offers an incredibly simple approach to handling 2FA accounts. From the application home screen, select the “+” icon from the upper right hand corner of the screen.

Once selected, your camera will be ready to scan the QR code the plugin provides. Another option is to choose “No Barcode” and enter the code manually. Regardless of which one you choose, once you enter the code you will be shown the account details on screen.
Here you can edit the username as well as assign an icon to easily recognise the account. Once you have finished editing the details, hit the save “tick” icon in the upper right corner of the screen.

You will now be shown your new verification code. Go ahead and enter that into the “Authentication Code” field in the Buyerdock 2fa setup process wizard. Once verified you will have successfully added 2FA protection to your Buyerdock account.
LastPass Authenticator
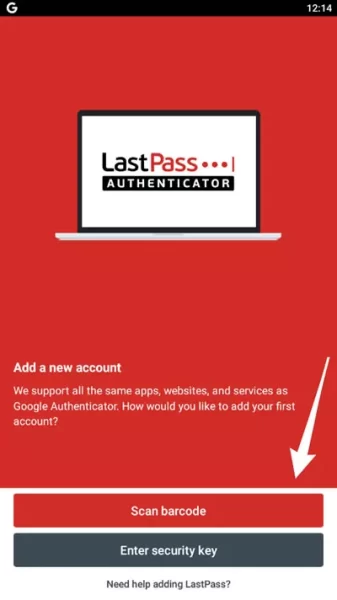
To begin adding your account to the LastPass Authenticator app, select “New Account” from the apps home screen and from the following screen.

From there – select if you would like to scan the QR code provided by the Buyerdock 2fa setup wizard, or enter the code manually.
Once you have scanned or entered the code, you will be immediately presented with the verification code needed to configure 2FA for your account.

Enter this code into the “Authentication Code” field provided within the Buyerdock 2fa setup wizard and hit “Finish” to verify your code. If successful you will be notified on screen and your Buyerdock account will now be even more secure.
FreeOTP
Although FreeOPT does not offer many of the refinements of other apps mentioned above, it’s still perfectly capable of the task and a breeze to set up. To add your account, select the “QR” icon at the upper centre of your app home screen. Another option is to enter the code manually. Once you select the QR code scan option, scan the code provided on-screen in the Buyerdock 2FA setup wizard.

When ready, the newly added account is listed in the FreeOTP app home screen. Select the account to reveal your one-time password. Enter this code into the “Authentication Code” field provided within the Buyerdock 2fa setup wizard. Hit “Finish” to verify your code. If successful you will be notified on screen and your Buyerdock account will now be even more secure.

Okta Verify
To setup Okta Verify as your authentication app, first, simply click the “+” icon in the lower right corner.

From the following screen you can either scan the QR code provided by the Buyerdock 2fa setup wizard or enter the code manually by clicking “no barcode?”.

Once done, your new profile will be setup and ready to use. You can even give your profile a unique name (which can help if you have multiple logins) if you wish.